

You pop in your Invisalign tray like you have a hundred times before, and something feels off. Maybe it wiggles slightly when you talk. Maybe you spot a sliver of daylight between the plastic and the edge of a tooth. Maybe it just does not hug your teeth the way it used to. Almost immediately, the worried question arrives: is my treatment falling apart? Take a breath, because in the overwhelming majority of cases, the answer is a reassuring no, and by the end of this article you will know exactly how to tell the difference between a normal loose feeling and a real problem, and precisely what to do about each.
This is one of the most common concerns patients bring to us, and most articles answer it with a vague list of tips. We want to do better. We will show you how to read your own aligners like a clinician, the exact technique that fixes most tracking problems, why a single stubborn tooth behaves differently than a whole loose arch, and the specific moment to pick up the phone. Let us get into the details that actually matter.
A Loose-Feeling Aligner Isn’t Always Bad News
Before we troubleshoot anything, here is a reassurance that resolves a surprising number of these worries. Not every loose sensation signals a problem, and two completely normal situations regularly get mistaken for one.
First, aligners are engineered to feel tight the moment you switch to a fresh set, then gradually feel looser over the next week or two as your teeth move into the exact positions that tray was designed to achieve. In other words, a tray that felt snug on day one and feels loose on day ten is often a tray that has finished its job. That loosening is success, not failure. Second, tiny gaps along the gumline are usually harmless, because a little space there simply keeps the plastic from digging into your gums. The gaps that genuinely matter are the ones at the biting edges and tips of your teeth, and especially a gap that hovers around a single tooth. Learning to tell these apart is the whole skill, so let us build it.
What “Tracking” Actually Means, and Why Teeth Fall Behind
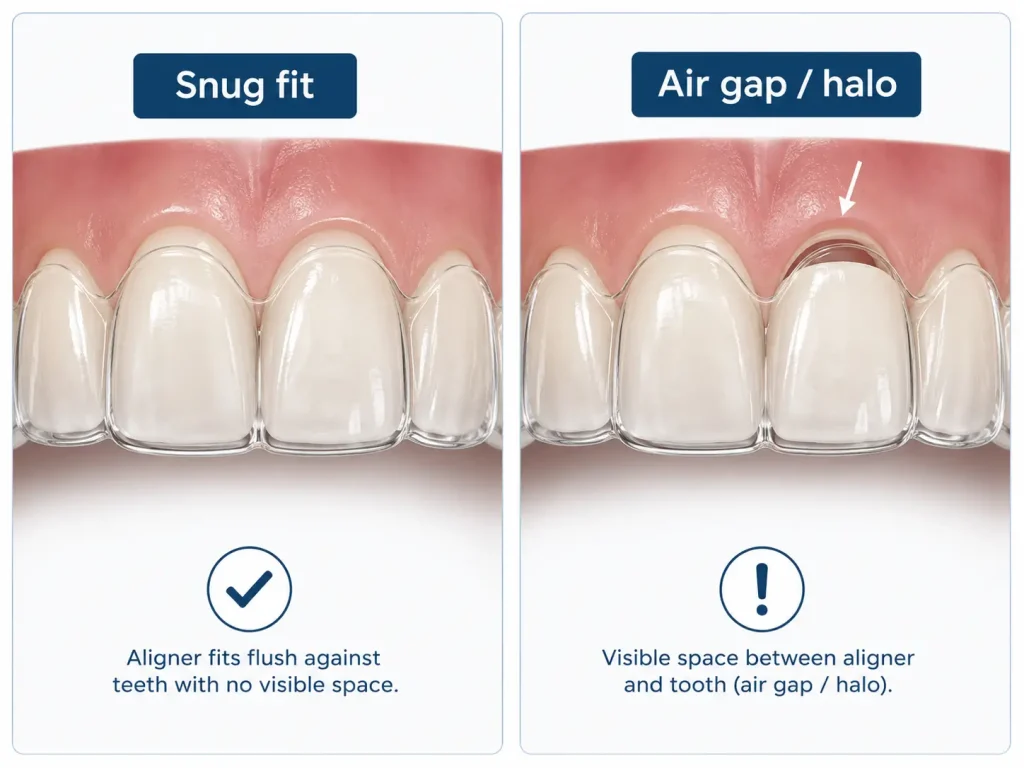
In Invisalign terms, tracking describes how faithfully your aligners fit the current position of your teeth. Each tray is a precise mold of where your teeth are supposed to be at that stage, engineered to move them by only a fraction of a millimeter, often around a quarter of a millimeter or a couple of degrees of rotation per tray. When everything is on schedule, the plastic hugs every tooth with no visible gaps. When a tooth falls behind, a space opens between the plastic and that tooth, because the mold no longer matches reality.
Here is the part almost no one explains, and it is genuinely reassuring once you understand it. Teeth are not passive pegs being pushed through the jaw. They are living structures anchored in bone that dissolves and rebuilds at its own biological pace, and that pace is not identical for every tooth or every person. Bone density, the shape and length of a tooth’s root, and the health of the ligament around it all influence how quickly a given tooth responds to pressure. This is why you can do everything right, wear your trays a full 22 hours, use your chewies faithfully, and still watch one tooth lag behind. It is not a personal failure. It is biology moving at its own speed, and it is exactly what the refinement phase exists to handle.
How to Read Your Own Aligners: The Air-Gap Test
You do not need special equipment to spot a tracking issue early, and catching it early is genuinely the difference between a quick fix and weeks of lost progress. Here is the exact self-check we teach our patients, which takes under a minute.
1. The mirror test. With your aligners in, look closely in a bright, well-lit mirror. Snug trays show the plastic sitting flush against every tooth, with no visible space at the biting edges or tips.
2. The flashlight test. Shine your phone’s flashlight straight at your smile while wearing the trays. This is the single most revealing check: any air gap between the aligner and a tooth will catch the light and glow as a small, clear halo. That halo is the classic sign of a tracking problem, and the flashlight makes it obvious when the naked eye might miss it.
3. The fingernail check. Run a clean fingernail along the edge of the tray where it meets each tooth. Anywhere the plastic lifts away or you feel a lip of space, that tooth is not fully seated.
Now interpret what you find, because not every gap means the same thing. This is where most online advice stops short, so here is a clinician’s way of reading the results:
| What you see | What it usually means | What to do |
| Tiny gap in the first 1 to 2 days of a new tray | Normal. The tray is still seating and teeth are just starting to move | Use chewies and keep wearing; it should close within a couple of days |
| Small gap at the very back molars | Often normal, especially at the last tooth in the arch | Keep an eye on it, but rarely a concern on its own |
| A clear gap over 1 to 2 mm at a front tooth or canine | A likely tracking issue: that tooth is lagging behind | Chewies plus full wear time; if it does not close in a few days, call your orthodontist |
| A gap that persists after several days of diligent wear | The tooth is not catching up on its own | Contact your orthodontist before advancing trays |
The single most useful distinction in that table is location. A gap at the very back molar is often nothing. A glowing halo around an upper front tooth or a canine, the pointed teeth that are notoriously hard for aligners to grip, is the one that deserves your attention.
Why Aligners Stop Tracking: The Real Causes, in Order of Likelihood
When a tray genuinely stops tracking, the cause almost always comes from this short list. We have ordered them roughly by how often we see them, so you can troubleshoot efficiently.
1. Not Enough Wear Time (By Far the Most Common)
This is the culprit in most cases, and it is also the easiest to fix, which is good news. Aligners only move teeth while they are actually on your teeth, and the biological signal that drives tooth movement fades within hours of removing them. The prescription is 20 to 22 hours a day for a reason: it keeps that signal continuously active. Here is the trap we see constantly, though. It is rarely the person who deliberately leaves their trays out. It is the innocent fifteen-minute break for a snack that quietly stretches to thirty minutes, then to an hour, and repeated a few times across a day suddenly adds up to five or six hours out. Do that for a week and your teeth fall meaningfully behind the plan. If your tracking slips, honest wear time is the very first thing to examine, and a wear-time reminder app is one of the simplest fixes there is.
2. Switching to a New Tray Too Early
It is tempting to advance to the next aligner ahead of schedule, especially when a tray feels loose and you assume your teeth must be ready. This is one of the most self-defeating mistakes in aligner treatment. If a tooth has not fully caught up to the current tray, the next tray, which is molded for a position that tooth has not reached, fits even worse. Now you are stacking one tracking error on top of another, and each subsequent tray compounds the problem. Always follow the exact change schedule your orthodontist gave you, typically one to two weeks per tray, and never advance early to “catch up.” It does the opposite.
3. Not Seating the Aligners Fully
Sometimes the trays simply are not being pushed all the way down onto the teeth, leaving a thin cushion of air that prevents the plastic from delivering its programmed pressure. This is exactly what chewies solve, and because seating technique matters so much, it gets its own detailed section below.
4. A Chipped or Lost Attachment
The small tooth-colored bumps bonded to certain teeth, called attachments, are precision-shaped to give the aligner grip on teeth that are otherwise hard to move, like round canines. When one chips off or wears down, the aligner loses its hold on that specific tooth, and that tooth quietly stalls while the rest of the arch keeps moving. This is one reason a lost attachment always warrants a call to your orthodontist, and it connects directly to why most patients need refinements at some point in treatment.
5. A Naturally Stubborn Tooth
Finally, some teeth are simply harder to move, and a good orthodontist often anticipates this from the very start. Rounded teeth like canines and premolars, severely rotated teeth, and teeth with unusual root shapes tend to lag no matter how perfect your compliance is. If your tracking issue is isolated to one of these teeth, it usually means that tooth needs a little more time or a planned refinement, not that anything has gone wrong.
The Chewie Technique Almost Everyone Gets Wrong
Chewies are those small cylinders of soft, springy plastic, usually a medical-grade styrene copolymer, that your orthodontist handed you at the start. Most patients treat them as an afterthought and use them for thirty seconds. Used correctly, they are the single most effective at-home tool for keeping your trays tracking. Here is the technique we actually teach, step by step.
1. Put your aligners in after eating and brushing, so nothing is trapped between the plastic and your teeth.
2. Place a chewie between your back teeth on one side and bite down firmly, then hold that pressure for at least five full seconds before releasing. The hold matters more than the chewing; it is sustained pressure that seats the tray.
3. Work methodically around your whole arch. Move the chewie forward tooth group by tooth group, then to the other side, biting and holding at each spot, so every part of the tray gets pressed down evenly rather than just the front.
4. Spend extra time on any area where you saw a gap in your flashlight test. That is precisely where the plastic needs the most help seating.
5. Do this for a full 5 to 10 minutes, twice a day. The best times are in the morning and, crucially, right before bed, so your trays are fully seated for the long, uninterrupted stretch of overnight wear when much of your tooth movement happens.
One practical note: chewies wear out. Once they stop springing back to their original shape after you bite, they have lost the elasticity that makes them work, and a flattened chewie does almost nothing. Rinse them with mild soap and water after use, and replace them when they no longer bounce back. A worn chewie is a common and completely avoidable reason trays do not seat.
What to Do if a Gap Won’t Close: The Right Sequence
If your self-check reveals a genuine, persistent gap, resist two opposite temptations: do not panic, and do not try to re-engineer your treatment on your own. There is a correct order of operations, and following it protects your timeline.
1. Double down on seating and wear time. For a small, recent gap, several days of diligent chewie use plus honest 22-hour wear closes most of them. Give this an honest few days before assuming something is wrong.
2. Ask about staying on your current tray longer. If a tooth has fallen slightly behind, your orthodontist may have you wear your current aligner for a few extra days to let it catch up before you advance. This is a common, sensible fix, but confirm it with your provider so your overall timeline stays coordinated.
3. Backtrack to a previous tray if advised. If a gap is worsening, your orthodontist might have you drop back one or two trays to a set that fit well, then work forward again. This backtracking technique is genuinely effective, but it should only be done under professional direction. This is exactly why you should keep your recent past aligners rather than throwing them away; they are your safety net.
4. Accept a refinement scan if needed. If tracking does not recover, a fresh scan and a new series of refinement aligners, matched to your teeth’s actual current position, gets everything back on plan. This is routine, not a restart.
When to Call Freedman & Haas (Don’t Wait for Your Next Visit)
Knowing when to reach out is as important as any at-home fix. Contact us promptly, rather than waiting for your next scheduled appointment, if you notice any of these:
• A clear, persistent gap of more than a millimeter or two at the biting edge or tip of a tooth that does not close after several days of diligent chewie use and full wear time.
• An attachment that has chipped, worn flat, or fallen off entirely.
• A tray that is visibly cracked, warped, or damaged, since a distorted tray cannot deliver its intended forces.
• Aligners that keep fitting poorly despite good compliance, which may mean it is time for a fresh scan and refinement aligners designed for where your teeth actually are now.
A quick message early can prevent weeks of ineffective treatment. We would genuinely rather hear from you the moment something looks off than discover a stalled tooth at a checkup two months later. Catching a tracking problem in its first few days is almost always the difference between a five-minute fix and a lengthy detour.
Stay on Track With Expert Support
A loose-feeling aligner is rarely cause for alarm, but it always deserves a knowing eye. Most tracking issues trace back to wear time or seating, and most fixes are refreshingly simple once you know what you are looking at. What genuinely matters is catching problems early and letting a specialist guide the solution, rather than guessing your way through. This kind of close, in-person monitoring is one of the clearest advantages of treating with a board-certified orthodontist rather than a remote, mail-order aligner service that never actually sees your teeth.
At Freedman & Haas Orthodontics, our team has guided more than 30,000 patients across West Palm Beach and Wellington toward straighter smiles, watching tracking closely at every step. If your aligners feel loose or you are unsure whether they are fitting correctly, send us a message or schedule a visit, and we will get you back on course with confidence.
Frequently Asked Questions
Is it normal for Invisalign to feel loose?
Often, yes. Aligners feel tight when new and gradually looser as your teeth reach the position that tray was designed for, so a tray that loosens over its week or two is usually doing its job. Small gaps at the gumline are also normal. The ones to watch are clear gaps at the biting edges or tips of teeth, especially a halo around a single front tooth or canine.
How big does an Invisalign gap have to be before I worry?
As a rule of thumb, a gap under about 1 millimeter during the first day or two of a new tray is normal seating. A gap larger than 1 to 2 millimeters, or any gap that persists after several days of diligent wear and chewie use, suggests a tracking issue worth having checked. Location matters too: gaps at the back molars are often fine, while gaps at front teeth or canines deserve more attention.
How long does it take for a tray to start tracking again?
For a minor, recently noticed gap, consistent chewie use and full 22-hour wear often close it within a few days. If it has not improved after roughly a week of diligent effort, that is your signal to contact your orthodontist rather than pushing ahead, since advancing to the next tray on top of a tracking problem only makes it worse.
Can I fix Invisalign tracking myself, or do I need my orthodontist?
You can and should handle the basics yourself: seat your trays fully with chewies, wear them the full 20 to 22 hours, and follow your change schedule exactly. However, backtracking to a previous tray or extending your wear time should only be done with your orthodontist’s guidance, because changing your plan on your own can set treatment back rather than help.
Will a tracking problem mean I have to start over?
Almost never. The vast majority of tracking issues are resolved with better seating, more wear time, backtracking a tray, or a fresh set of refinement aligners. Starting completely over is very rare. The key is addressing the issue early, while it is still small, rather than letting a lagging tooth persist tray after tray.