You have committed to Invisalign. You have had your iTero scan. You have seen your ClinCheck animation showing how your teeth will move. And then at your first real appointment, the orthodontist places tooth-colored bumps on several of your teeth before handing you your first set of aligners.
If nobody explained this part in advance, it can be a surprise, and a confusing one. What are those bumps? Why do you need them? Are they going to show? Will they hurt? These are among the most common questions patients ask at Freedman & Haas after their first attachment appointment, and they are questions that deserve thorough answers. This guide covers exactly what attachments and buttons are, what they do mechanically, why they are placed where they are, how many you might need, and what your day-to-day experience with them will actually look like from placement through removal.
What Are Invisalign Attachments?
Invisalign attachments are small, precisely shaped pieces of composite resin material bonded directly to the surface of specific teeth. They serve as anchor points, handles essentially, that give the aligner something to grip onto so it can apply force in directions and angles that a smooth aligner surface alone cannot achieve.
Without attachments, an Invisalign aligner sits over the teeth and moves them through gentle, distributed pressure. That works well for straightforward movements like tipping teeth slightly or closing small gaps. But many orthodontic corrections require more precise, directional force, including rotating a tooth around its long axis, moving it vertically, or controlling root position. For those movements, attachments give the aligner a mechanical advantage it would not otherwise have. Understanding how aligners straighten teeth makes it easier to see why attachments are not an add-on but a fundamental part of how Invisalign handles complex movements.
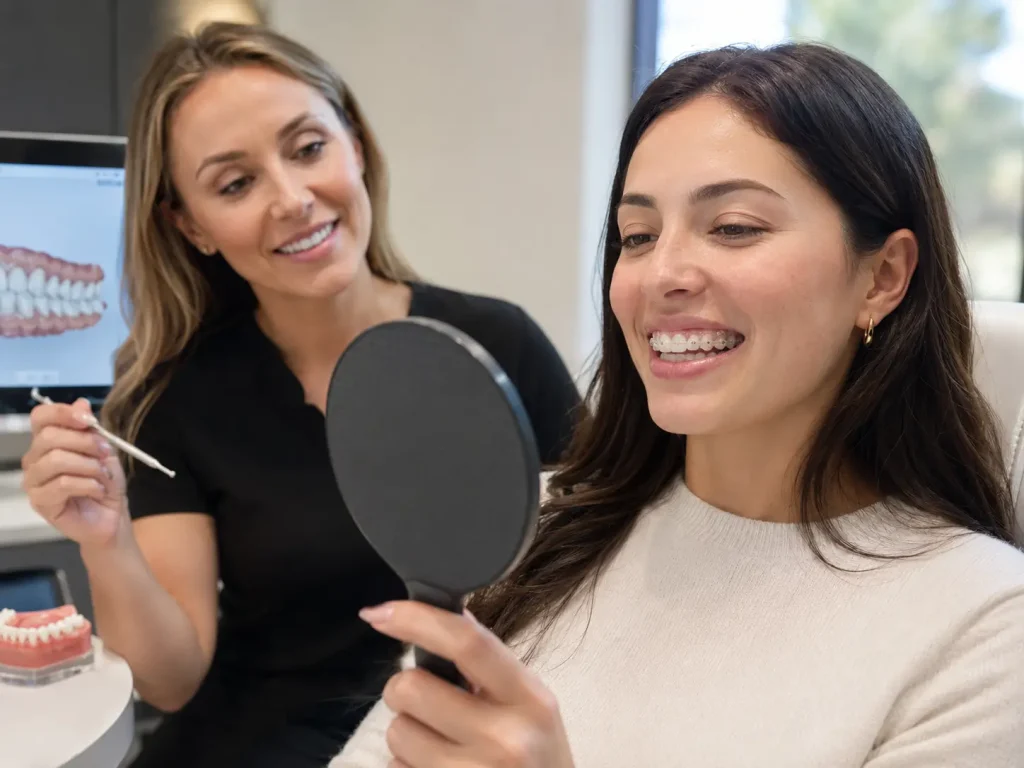
What They Look Like: Tiny Tooth-Colored Bumps
Attachments are small, typically a few millimeters in each dimension, and shaped to match the specific movement needed at that tooth. Some are rectangular, some are beveled, some are triangular. They are placed on the visible surface of the tooth, which means they are potentially visible when you smile.
In practice, most patients with attachments find them far less conspicuous than expected. The composite resin is matched to tooth color, and at normal conversational distance, attachments are subtle. They become more noticeable when the aligners are out, but most Invisalign patients spend the majority of their time with aligners in, at which point the attachments are largely obscured by the plastic.
What They’re Made Of: Composite Resin
Invisalign attachments are made from composite resin, the same material used for tooth-colored dental fillings. The material bonds to the enamel surface, is polished smooth, and is completely safe for long-term use. It causes no damage to the enamel itself, and when attachments are removed at the end of treatment, the surface underneath is restored through a gentle polishing process that leaves the tooth looking exactly as it did before.
What Are Invisalign Buttons (and How They’re Different From Attachments)
Buttons are sometimes confused with attachments, but they serve a distinct purpose. While attachments are composite shapes bonded to the tooth to give the aligner a better grip, buttons are small metal or tooth-colored fixtures bonded to specific teeth to serve as anchor points for rubber bands, also called elastics.
Rubber bands used with buttons apply cross-arch force, meaning force that works between the upper and lower jaws, to correct overbites, underbites, and certain bite asymmetries. This is a movement that aligners alone, even with attachments, cannot produce. The button is the anchor the elastic hooks onto, creating the necessary inter-arch tension.
Patients who need buttons typically wear small elastics from a button on an upper tooth to a button or hook on a lower tooth, usually for much of each day. Your orthodontist will demonstrate exactly how to place and remove them, and you will be given a supply of elastics to replace them as needed throughout treatment.
Why You May Need Attachments or Buttons
The decision about which teeth get attachments, what shape those attachments are, and where buttons are placed is made during the Invisalign treatment planning process. It reflects the specific movements your orthodontist has mapped out to achieve your final result. Attachments are not placed randomly; each one is positioned purposefully to support a specific tooth movement.
Rotations, Tipping, and Vertical Movement
Rotational movements, turning a tooth to face the correct direction along its long axis, are among the most mechanically demanding movements in orthodontics. A smooth aligner surface has difficulty producing the precise couple of forces needed to rotate a tooth predictably. An attachment changes that: its shape creates a geometric surface the aligner presses against at the right angle to generate rotational force.
Vertical movement, extruding a tooth downward or intruding one upward, also relies heavily on attachments. Without an attachment, the aligner has little to push against to move a tooth vertically. With a precisely shaped attachment at the right position, the aligner can apply the vertical force needed for that movement.
Closing Gaps and Correcting Bite Issues
For gap closure and bite correction, attachments help control root angulation during movement, ensuring that teeth do not simply tip toward each other but move with the root and crown in proper alignment. This root control is critical for producing stable, functional results rather than simply repositioning tooth crowns into the right visual position while leaving the roots misaligned beneath the gumline.
Using Rubber Bands With Buttons for Overbite or Underbite
When the treatment plan includes correction of an overbite or underbite, buttons and rubber bands are typically the mechanism. The elastics apply gentle but continuous force between the upper and lower jaws, encouraging the jaw relationship to shift in the desired direction over the course of treatment. This is one of the areas where Invisalign treatment in experienced hands produces results that providers with less orthodontic training may struggle to replicate consistently.
Will Every Invisalign Patient Need Them?
No. Attachments and buttons are placed based on what each specific case requires. Patients with very mild corrections, such as minor spacing or minimal crowding, may complete treatment with few or no attachments. Patients with more complex cases, particularly those involving rotations, vertical movements, or bite correction, typically have more.
The number and distribution of attachments in your treatment plan reflects your case complexity and the precision of the planning behind it. If you have many attachments, it means your treatment involves the kind of multi-directional movements that require mechanical support, which is actually a sign of a thorough, well-planned case rather than a complication.
How Many Attachments Will I Need?
The number varies significantly by case complexity.
Mild Cases: 1 to 3 Attachments
Simple corrections requiring only targeted movement of one or two teeth may need just one to three attachments placed on the specific teeth that require rotational or vertical control. The remaining teeth move through aligner pressure alone.
Moderate Cases: 4 to 8 Attachments
Most comprehensive Invisalign cases involving crowding, spacing, and some degree of bite correction fall in the range of four to eight attachments. These are distributed across the teeth that require the most precise control throughout treatment.
Complex Cases: 9 or More Attachments
Cases involving significant bite correction, multiple rotations, vertical movements, or sophisticated sequencing may involve nine or more attachments. This is not a sign that something is wrong; it reflects the level of mechanical support needed for a complete, complex correction. Patients in this category benefit most from an orthodontist with deep expertise in managing advanced Invisalign cases.
How Invisalign Attachments Are Placed (Step by Step)
Attachment placement is a chairside procedure done during one of your early treatment appointments. It typically takes 30 to 45 minutes, requires no anesthesia, and is painless for the vast majority of patients.
The process works as follows: the teeth are cleaned and lightly conditioned to help the composite bond properly. A template aligner, a copy of your first aligner with cutouts in the precise positions for each attachment, is placed over your teeth. Composite resin is injected into each cutout and light-cured with a small UV lamp. The template is removed, and the composite bumps remain bonded to the teeth in exactly the right positions. The orthodontist then polishes and shapes each attachment, and you are ready to begin active treatment.
Are Invisalign Attachments Visible?
They are visible on close inspection when your aligners are out, but at normal conversational distance, most patients report that their attachments go unnoticed by others. With the aligners in, the plastic diffuses the appearance of the bumps and makes them even less prominent.
Attachments placed on front teeth are slightly more noticeable than those placed on back teeth. Your orthodontist positions them to achieve the required movement, but experienced providers are mindful of aesthetics in treatment planning wherever the clinical situation allows for it.
Do Invisalign Attachments Hurt?
Attachment placement itself is painless. Some patients notice a slight roughness or increased awareness of their teeth in the first day or two after placement, particularly when running their tongue over the new surfaces. This awareness fades quickly as the mouth adapts to the composite.
New sets of aligners on teeth with attachments can feel tighter or more pressured than aligners on teeth without them, because the aligner is now engaging more precisely with the attachment geometry. This is expected and typically resolves within the first day or two of each new aligner set. For a broader picture of what to expect in terms of sensation throughout Invisalign treatment, does Invisalign hurt covers what is normal discomfort versus what warrants a call to the office.
How to Care for Your Teeth and Aligners With Attachments
Eating and Drinking
Attachments do not restrict what you eat. One of Invisalign’s major advantages is that the aligners are removed for eating, so you are not navigating food restrictions the way patients with fixed braces do. However, when the aligners are out, the composite attachments are somewhat more susceptible to staining from dark beverages like coffee, red wine, and tea than smooth enamel. Rinsing with water after consuming staining foods and drinks helps maintain attachment color throughout treatment.
Brushing, Flossing, and Cleaning Your Aligners
Teeth with attachments require careful brushing around the composite surfaces to prevent plaque accumulation at the edges where the composite meets the enamel. A soft-bristle toothbrush and thorough technique around each attachment is important, but this adds only a small amount of time to a normal brushing routine. Flossing is unchanged from your pre-treatment routine, since there are no wires to thread under as with fixed braces. Clean your aligners daily using a soft brush and cool water or aligner cleaning crystals, and avoid hot water, which can warp the plastic.
What to Do If an Attachment Falls Off
Attachments can occasionally detach, particularly if you bite into something particularly hard or if the composite bond is challenged by a concentrated force. If an attachment comes off, it is not an emergency and the tooth is not damaged, but you should call the office to arrange for it to be rebonded. Continuing treatment without a detached attachment may cause that tooth’s movement to fall behind the plan, so it is worth addressing promptly rather than waiting for a scheduled appointment.
How Long Do Attachments Stay On?
Attachments remain in place for as long as they are needed, which for most patients is the majority of the active treatment phase. Some attachments may be removed partway through treatment once they have served their purpose and the remaining movements do not require them. Others stay until the very end. For context on how the overall timeline works, how long does Invisalign take explains the general treatment duration and what factors affect it, including case complexity of the type that typically requires more attachments.
What Happens When Attachments Are Removed
Removal is straightforward and painless. The orthodontist uses a polishing bur to gently remove the composite from the tooth surface. Because the composite bonds to the outermost layer of enamel without any drilling or removal of tooth structure, the underlying enamel is preserved. After polishing, the tooth surface is smooth and indistinguishable from its pre-treatment state.
Can You Refuse Attachments?
Technically, yes. But doing so typically means the treatment cannot achieve the movements it was planned around. If your case requires rotations or vertical movements supported by attachments, proceeding without them means those movements either will not happen or will not happen correctly, and the final result will reflect that gap.
Occasionally, patients decline attachments on highly visible front teeth for aesthetic reasons. In those situations, the orthodontist may modify the treatment plan to work around the attachment, but this is a clinical compromise. The final result may be less complete than the original plan, and understanding that tradeoff clearly before making any decisions is essential.
Why an Experienced Invisalign Orthodontist Matters for Attachment Planning
Attachment planning is where orthodontic expertise makes a measurable difference in outcomes. The decision about which teeth receive which attachment shapes, and how those attachments interact with aligner geometry to produce specific movements, requires a deep understanding of biomechanics that comes from extensive clinical training. General dentists who offer Invisalign may have limited experience with complex attachment planning, which is one reason why the results of Invisalign treatment vary significantly depending on who is managing the case.
At Freedman & Haas Orthodontics, Dr. Freedman’s participation in the Dayan Invisalign Masterclass Series, one of the most advanced continuing education programs focused specifically on complex Invisalign cases, reflects exactly this kind of commitment to sophisticated treatment planning. Every case at our West Palm Beach and Wellington offices is evaluated and planned by board-certified orthodontists with decades of combined clinical experience. For patients who want to understand our financing and insurance options before committing to treatment, that information is available and our team walks through it before the first appointment.
Conclusion
Invisalign attachments are not a complication or a surprise twist in treatment. They are an engineering solution, the mechanism that allows Invisalign to accomplish the precise, three-dimensional tooth movements that produce a complete, functional, lasting result. The key things to remember: attachments are made from the same composite resin as tooth-colored fillings and cause no damage to enamel; the number you need reflects the complexity of your case, not a problem with the treatment; buttons are different from attachments and are used for inter-arch corrections like overbites; and attachment planning is one of the areas where an experienced orthodontist’s expertise most directly affects your final result.
If you are starting Invisalign and have been told you will need attachments, that reflects a thorough treatment plan. And if you have questions about what your specific attachments are doing and why, your orthodontist should be able to explain each one clearly. Ready to find out if Invisalign is right for you? Book a free consultation at Freedman & Haas Orthodontics in West Palm Beach or Wellington. We will walk you through everything, attachments included.